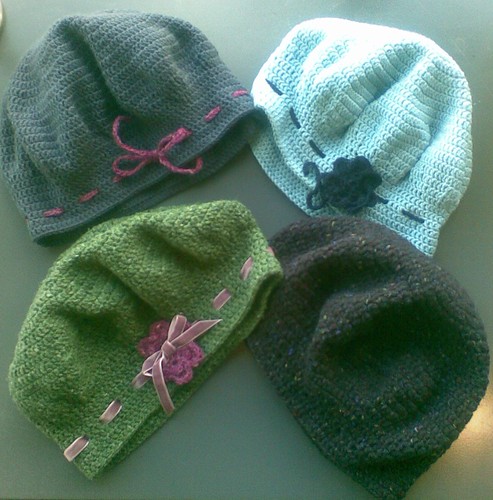
Well, another one bites the dust...
As modelled by the reluctant 10 year old...
This one is for a 21st birthday present and was a joy to crochet. I made it out of Jo Sharp Alpaca Silk Georgette which is 40% Alpaca, 40% Merino and 20% Silk. It's amazingly soft to touch but when you crochet it up it doesn't quite feel as soft but it is? Does that make sense? What is also amazing about it is that when you crochet with it, you can feel how silky it is and the hook just glides through the loops and chains. Whilst it's very soft it is also holds a bit of weight so falls really nicely as a beret. It's certainly not cheap yarn but there's nothing worse than an itchy hat so it's definitely worth the investment!
That having been said it is a finer yarn than the others I have used and I had to add an extra few rows to the top and when I decreased. If you decide to use the pattern I have provided just be mindful that the top of the beret should measure approximately 27- 28cm in diameter and you should adapt the pattern accordingly. If you do end up adapting the pattern to account for the yarn and hook size you are using, then you will also need to be careful in how many rows you decrease and how many rows you do for the band too. A finer yarn may require more, a thicker yarn, less. I will add this note to the pattern page too.
Happy hooking!
Showing posts with label starrberry beret. Show all posts
Friday, July 24, 2009
Monday, July 20, 2009
starrberry beret...pattern
Well I've done it! I've drawn up the pattern and this time I did it properly. After posting the Ivyberry hat pattern I was feeling particularly sheepish about my ad hoc patterning ways. I was worried I'd end up with comments filled with scorn and frustration at my pattern shortcuts. I don't want to lead anyone astray with my patterning, I want you to enjoy the process as much as I do.
So, what did I do differently? I made the beret 4 times. I used a calculator. I did lots of adding, multiplication and dividing. Lot's of numbers were buzzing through my head, lot's of scribbles on paper. I have perfected it, at least I think I have? In truth I haven't made the final version of the pattern up, but I am pretty sure it will work out beautifully (unless my math is wrong? Now is not the time to doubt myself, eek).
So here it is Nikki - just for you as promised ; ). Can't wait to see how you all go! Have even created a flickr group for those that end up with a finished product. Good luck and enjoy!
Starrberry Beret Crochet Pattern - by M*
This pattern is being provided for free. All I ask is that if you make the pattern, please make sure you reference it to me and link back to my site at http://emmstarr.blogspot.com/. Oh and please let me know if you do make it. I’d like to hear if there are any issues with the pattern and I’d love to see how they all turn out! If you'd like you can post a picture of your beret on the starrberry flickr group page here.
To make I’ve used:
3.5mm crochet hook
2 x Jo Sharp Silkroad DK Tweed or
2 x Jo Sharp Silkroad Aran Tweed or
2 x Debbie Bliss Baby Cashmerino or
2 x Morris Paddington 6ply (80% Bamboo/20 % Merino) – this one is great to use. It’s a heavy weighted yarn so falls nicely and has a cotton feel to it or
you can use any other similar sized beautiful yarn
Lots of cups of earl grey tea (optional)
Row 1) Chain 4. 1 treble (tr) into the 4th chain from hook. Repeat a further 11 times. Join into the top of the chain with a slip stitch (sl st).
Row 2) Chain 3. 2tr into top of first stitch of of previous row. *2tr in next stitch. Repeat * all around. Join to top of chain with sl st.
Row 3) Chain 3. *2tr in first stitch, 1tr in next stitch. Repeat*. Join to top of chain with sl st.
Row 4) Chain 3. *2tr in first stitch, 1tr in each of next 2 stitches. Repeat*. Join to top of chain with sl st.
Row 5) Chain 3. *2tr in first stitch, 1tr in each of next 3 stitches. Repeat*. Join to top of chain with sl st.
Row 6) Chain 3. *2tr in first stitch, 1tr in each of next 4 stitches. Repeat*. Join to top of chain with sl st.
Row 7) Chain 3. *2tr in first stitch, 1tr in each of next 5 stitches. Repeat*. Join to top of chain with sl st.
Row 8) Chain 3. *2tr in first stitch, 1tr in each of next 6 stitches. Repeat*. Join to top of chain with sl st.
Row 9) Chain 3. *2tr in first stitch, 1tr in each of next 7 stitches. Repeat*. Join to top of chain with sl st.
Row 10) Chain 3. *2tr in first stitch, 1tr in each of next 8 stitches. Repeat*. Join to top of chain with sl st.
Row 11) Chain 3. *2tr in first stitch, 1tr in each of next 9 stitches. Repeat*. Join to top of chain with sl st.
Row 12) Chain 3. *2tr in first stitch, 1tr in each of next 10 stitches. Repeat*. Join to top of chain with sl st.
Row 13) Chain 3. *2tr in first stitch, 1tr in each of next 11 stitches. Repeat*. Join to top of chain with sl st.
Row 14) Chain 3. *2tr in first stitch, 1tr in each of next 12 stitches. Repeat*. Join to top of chain with sl st.
Row 15 - 17) Chain 3. *1 tr in each stitch all away around. Join to top of chain with sl st.
Row 18) Chain 3. *1tr in first 5 stitches, treble 2 together (tr2tog). Repeat*. Join to top of chain with sl st.
Row 19) Chain 3. *1tr in first 3 stitches, tr2tog. Repeat*. Join to top of chain with sl st.
Row 20) Chain 3. *1tr in first 8 stitches, tr2tog. Repeat*. Join to top of chain with sl st.
I’ve decided to give you two possible happy endings for this pattern; one with holes and one without. It’s essentially a choose your own adventure, so figure out which way you want to go and proceed accordingly.
With holes:
Row 21-22) Chain 3. *1 tr in each stitch all away around. Join to top of chain with sl st.
Row 23) Chain 3. *1 tr in next 2 stitches, chain 1. Skip next stitch *1 tr in next 3 stitches. Chain 1. Skip next stitch. *Repeat. Join to top of chain with sl st.
Row 24) Chain 3. *1 tr in each stitch all away around. Join to top of chain with sl st.
Row 25) Chain 3. *1 tr in each stitch all away around. Join to top of chain with sl st. Cast off. Finito!
Without holes:
Row 21-24) Chain 3. *1 tr in each stitch all away around. Join to top of chain with sl st.
Row 25) Chain 3. *1 tr in each stitch all away around. Join to top of chain with sl st. Cast off. Finito!
Decorative ideas
Crochet a length of chain in contrasting yarn long enough to thread through the holes in the hat and tie at the side.
Crochet a flower in a contrasting yarn. Perhaps you’d like to attach the flower with a button in the centre?
Buy a length of thin velvet ribbon and thread through the holes and tie into a neat bow. (you may want to stitch this to keep in place)
Attach a mixture of crochet flowers/buttons or both.
Make a combination from any of the suggestions above.
Make up your own decorative idea. Please make sure you let me know if you do. I’d love to see.
If you'd like a PDF of the pattern please click here.
*Note: If you decide to use this pattern just be mindful that the top of the beret should measure approximately 27- 28cm in diameter and you should adapt the pattern accordingly. If you do end up adapting the pattern to account for the yarn and hook size you are using, then you will also need to be careful with how many rows you decrease and how many rows you do for the band too. A finer yarn may require more, a thicker yarn, less. Always test the size too.
So, what did I do differently? I made the beret 4 times. I used a calculator. I did lots of adding, multiplication and dividing. Lot's of numbers were buzzing through my head, lot's of scribbles on paper. I have perfected it, at least I think I have? In truth I haven't made the final version of the pattern up, but I am pretty sure it will work out beautifully (unless my math is wrong? Now is not the time to doubt myself, eek).
So here it is Nikki - just for you as promised ; ). Can't wait to see how you all go! Have even created a flickr group for those that end up with a finished product. Good luck and enjoy!
Starrberry Beret Crochet Pattern - by M*
This pattern is being provided for free. All I ask is that if you make the pattern, please make sure you reference it to me and link back to my site at http://emmstarr.blogspot.com/. Oh and please let me know if you do make it. I’d like to hear if there are any issues with the pattern and I’d love to see how they all turn out! If you'd like you can post a picture of your beret on the starrberry flickr group page here.
To make I’ve used:
3.5mm crochet hook
2 x Jo Sharp Silkroad DK Tweed or
2 x Jo Sharp Silkroad Aran Tweed or
2 x Debbie Bliss Baby Cashmerino or
2 x Morris Paddington 6ply (80% Bamboo/20 % Merino) – this one is great to use. It’s a heavy weighted yarn so falls nicely and has a cotton feel to it or
you can use any other similar sized beautiful yarn
Lots of cups of earl grey tea (optional)
Row 1) Chain 4. 1 treble (tr) into the 4th chain from hook. Repeat a further 11 times. Join into the top of the chain with a slip stitch (sl st).
Row 2) Chain 3. 2tr into top of first stitch of of previous row. *2tr in next stitch. Repeat * all around. Join to top of chain with sl st.
Row 3) Chain 3. *2tr in first stitch, 1tr in next stitch. Repeat*. Join to top of chain with sl st.
Row 4) Chain 3. *2tr in first stitch, 1tr in each of next 2 stitches. Repeat*. Join to top of chain with sl st.
Row 5) Chain 3. *2tr in first stitch, 1tr in each of next 3 stitches. Repeat*. Join to top of chain with sl st.
Row 6) Chain 3. *2tr in first stitch, 1tr in each of next 4 stitches. Repeat*. Join to top of chain with sl st.
Row 7) Chain 3. *2tr in first stitch, 1tr in each of next 5 stitches. Repeat*. Join to top of chain with sl st.
Row 8) Chain 3. *2tr in first stitch, 1tr in each of next 6 stitches. Repeat*. Join to top of chain with sl st.
Row 9) Chain 3. *2tr in first stitch, 1tr in each of next 7 stitches. Repeat*. Join to top of chain with sl st.
Row 10) Chain 3. *2tr in first stitch, 1tr in each of next 8 stitches. Repeat*. Join to top of chain with sl st.
Row 11) Chain 3. *2tr in first stitch, 1tr in each of next 9 stitches. Repeat*. Join to top of chain with sl st.
Row 12) Chain 3. *2tr in first stitch, 1tr in each of next 10 stitches. Repeat*. Join to top of chain with sl st.
Row 13) Chain 3. *2tr in first stitch, 1tr in each of next 11 stitches. Repeat*. Join to top of chain with sl st.
Row 14) Chain 3. *2tr in first stitch, 1tr in each of next 12 stitches. Repeat*. Join to top of chain with sl st.
Row 15 - 17) Chain 3. *1 tr in each stitch all away around. Join to top of chain with sl st.
Row 18) Chain 3. *1tr in first 5 stitches, treble 2 together (tr2tog). Repeat*. Join to top of chain with sl st.
Row 19) Chain 3. *1tr in first 3 stitches, tr2tog. Repeat*. Join to top of chain with sl st.
Row 20) Chain 3. *1tr in first 8 stitches, tr2tog. Repeat*. Join to top of chain with sl st.
I’ve decided to give you two possible happy endings for this pattern; one with holes and one without. It’s essentially a choose your own adventure, so figure out which way you want to go and proceed accordingly.
With holes:
Row 21-22) Chain 3. *1 tr in each stitch all away around. Join to top of chain with sl st.
Row 23) Chain 3. *1 tr in next 2 stitches, chain 1. Skip next stitch *1 tr in next 3 stitches. Chain 1. Skip next stitch. *Repeat. Join to top of chain with sl st.
Row 24) Chain 3. *1 tr in each stitch all away around. Join to top of chain with sl st.
Row 25) Chain 3. *1 tr in each stitch all away around. Join to top of chain with sl st. Cast off. Finito!
Without holes:
Row 21-24) Chain 3. *1 tr in each stitch all away around. Join to top of chain with sl st.
Row 25) Chain 3. *1 tr in each stitch all away around. Join to top of chain with sl st. Cast off. Finito!
Decorative ideas
Crochet a length of chain in contrasting yarn long enough to thread through the holes in the hat and tie at the side.
Crochet a flower in a contrasting yarn. Perhaps you’d like to attach the flower with a button in the centre?
Buy a length of thin velvet ribbon and thread through the holes and tie into a neat bow. (you may want to stitch this to keep in place)
Attach a mixture of crochet flowers/buttons or both.
Make a combination from any of the suggestions above.
Make up your own decorative idea. Please make sure you let me know if you do. I’d love to see.
If you'd like a PDF of the pattern please click here.
*Note: If you decide to use this pattern just be mindful that the top of the beret should measure approximately 27- 28cm in diameter and you should adapt the pattern accordingly. If you do end up adapting the pattern to account for the yarn and hook size you are using, then you will also need to be careful with how many rows you decrease and how many rows you do for the band too. A finer yarn may require more, a thicker yarn, less. Always test the size too.
Labels:
crochet,
pattern,
starrberry beret
Subscribe to:
Posts (Atom)