


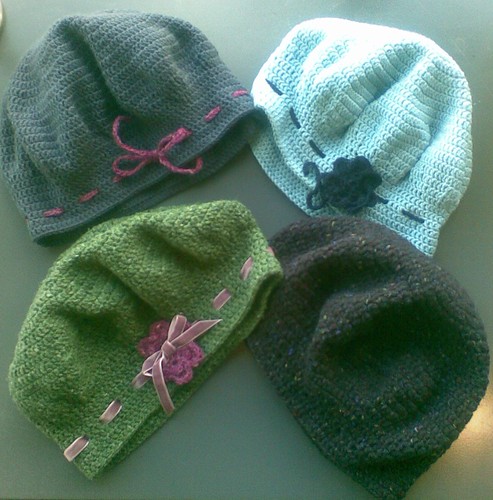
So, what did I do differently? I made the beret 4 times. I used a calculator. I did lots of adding, multiplication and dividing. Lot's of numbers were buzzing through my head, lot's of scribbles on paper. I have perfected it, at least I think I have? In truth I haven't made the final version of the pattern up, but I am pretty sure it will work out beautifully (unless my math is wrong? Now is not the time to doubt myself, eek).
So here it is Nikki - just for you as promised ; ). Can't wait to see how you all go! Have even created a flickr group for those that end up with a finished product. Good luck and enjoy!
Starrberry Beret Crochet Pattern - by M*
This pattern is being provided for free. All I ask is that if you make the pattern, please make sure you reference it to me and link back to my site at http://emmstarr.blogspot.com/. Oh and please let me know if you do make it. I’d like to hear if there are any issues with the pattern and I’d love to see how they all turn out! If you'd like you can post a picture of your beret on the starrberry flickr group page here.
To make I’ve used:
3.5mm crochet hook
2 x Jo Sharp Silkroad DK Tweed or
2 x Jo Sharp Silkroad Aran Tweed or
2 x Debbie Bliss Baby Cashmerino or
2 x Morris Paddington 6ply (80% Bamboo/20 % Merino) – this one is great to use. It’s a heavy weighted yarn so falls nicely and has a cotton feel to it or
you can use any other similar sized beautiful yarn
Lots of cups of earl grey tea (optional)
Row 1) Chain 4. 1 treble (tr) into the 4th chain from hook. Repeat a further 11 times. Join into the top of the chain with a slip stitch (sl st).
Row 2) Chain 3. 2tr into top of first stitch of of previous row. *2tr in next stitch. Repeat * all around. Join to top of chain with sl st.
Row 3) Chain 3. *2tr in first stitch, 1tr in next stitch. Repeat*. Join to top of chain with sl st.
Row 4) Chain 3. *2tr in first stitch, 1tr in each of next 2 stitches. Repeat*. Join to top of chain with sl st.
Row 5) Chain 3. *2tr in first stitch, 1tr in each of next 3 stitches. Repeat*. Join to top of chain with sl st.
Row 6) Chain 3. *2tr in first stitch, 1tr in each of next 4 stitches. Repeat*. Join to top of chain with sl st.
Row 7) Chain 3. *2tr in first stitch, 1tr in each of next 5 stitches. Repeat*. Join to top of chain with sl st.
Row 8) Chain 3. *2tr in first stitch, 1tr in each of next 6 stitches. Repeat*. Join to top of chain with sl st.
Row 9) Chain 3. *2tr in first stitch, 1tr in each of next 7 stitches. Repeat*. Join to top of chain with sl st.
Row 10) Chain 3. *2tr in first stitch, 1tr in each of next 8 stitches. Repeat*. Join to top of chain with sl st.
Row 11) Chain 3. *2tr in first stitch, 1tr in each of next 9 stitches. Repeat*. Join to top of chain with sl st.
Row 12) Chain 3. *2tr in first stitch, 1tr in each of next 10 stitches. Repeat*. Join to top of chain with sl st.
Row 13) Chain 3. *2tr in first stitch, 1tr in each of next 11 stitches. Repeat*. Join to top of chain with sl st.
Row 14) Chain 3. *2tr in first stitch, 1tr in each of next 12 stitches. Repeat*. Join to top of chain with sl st.
Row 15 - 17) Chain 3. *1 tr in each stitch all away around. Join to top of chain with sl st.
Row 18) Chain 3. *1tr in first 5 stitches, treble 2 together (tr2tog). Repeat*. Join to top of chain with sl st.
Row 19) Chain 3. *1tr in first 3 stitches, tr2tog. Repeat*. Join to top of chain with sl st.
Row 20) Chain 3. *1tr in first 8 stitches, tr2tog. Repeat*. Join to top of chain with sl st.
I’ve decided to give you two possible happy endings for this pattern; one with holes and one without. It’s essentially a choose your own adventure, so figure out which way you want to go and proceed accordingly.
With holes:
Row 21-22) Chain 3. *1 tr in each stitch all away around. Join to top of chain with sl st.
Row 23) Chain 3. *1 tr in next 2 stitches, chain 1. Skip next stitch *1 tr in next 3 stitches. Chain 1. Skip next stitch. *Repeat. Join to top of chain with sl st.
Row 24) Chain 3. *1 tr in each stitch all away around. Join to top of chain with sl st.
Row 25) Chain 3. *1 tr in each stitch all away around. Join to top of chain with sl st. Cast off. Finito!
Without holes:
Row 21-24) Chain 3. *1 tr in each stitch all away around. Join to top of chain with sl st.
Row 25) Chain 3. *1 tr in each stitch all away around. Join to top of chain with sl st. Cast off. Finito!
Decorative ideas
Crochet a length of chain in contrasting yarn long enough to thread through the holes in the hat and tie at the side.
Crochet a flower in a contrasting yarn. Perhaps you’d like to attach the flower with a button in the centre?
Buy a length of thin velvet ribbon and thread through the holes and tie into a neat bow. (you may want to stitch this to keep in place)
Attach a mixture of crochet flowers/buttons or both.
Make a combination from any of the suggestions above.
Make up your own decorative idea. Please make sure you let me know if you do. I’d love to see.
If you'd like a PDF of the pattern please click here.
*Note: If you decide to use this pattern just be mindful that the top of the beret should measure approximately 27- 28cm in diameter and you should adapt the pattern accordingly. If you do end up adapting the pattern to account for the yarn and hook size you are using, then you will also need to be careful with how many rows you decrease and how many rows you do for the band too. A finer yarn may require more, a thicker yarn, less. Always test the size too.





12 comments:
They look gorgeous! I love their name 'starrberry' too. It is amazing and generous that you making up patterns and putting them out there for people to use. I, on the other hand, am using lots of other people's patterns, not at all ready to make up my own yet.
The berets look terrific! Thanks so much for providing a copy of the pattern. I'll definitely be giving it a go! Lovely to meet you on Saturday too.
OOOOOOOOOH! Thanks so much M* you are a STAR! I love this beret, its so vintage looking and Gorgeous. Im off to Lincraft today to buy some beautiful to make it with. I will get started tonight!
Thanks again M*, you are soooo lovley!
Right. Since I'm at Mum's RIGHT NOW I am goin gto hand her this pattern tonight while she's cranking out the poncho so she has something to seque (sp?) into once she finished! Thanks Mel!
And who knew crafting involved so much math?! If I did i'd of never started it!
Oh "guest" is me (Mel) while I'm at Mum's place!
thank you. I still view myself as an amateur crocheter and don't feel I have any right to sell a pattern when there is no guarantee of accuracy! I crochet the pattern and it works but it might not work for someone else who is more experienced. I guess I don't have to share, but that goes against my philosophy. Besides, it's important to test the pattern isn't it?
It was lovely to meet you too! Good luck with the pattern. I hope it works out for you. Please let me know if it doesn't, I'd like to make sure it works for others too.
My pleasure Nikki! Goodluck with making it and don't forget to let me know how you go! Do I sound like a broken record?
Excellent! Crossing my fingers it works out for your mum (and you!) To tell you the truth after posting this pattern I got paranoid about the maths bit. I did some working out on paper and realised that the math wasn't entirely right afterall. But it's ok, cos this is exactly how I made my last beret. It should work.
this is gorgeous hat, I hope you don`t mind I make one for myself and my daughter! thank you for sharing!
x
I. Just. Need. To. Get. At. Some. Yarn.
Desperate for some time and opportunity to get my teeth into this. Thanks for the very generous sharing of both hatty numbers...
can you please put the PDF link back, I would really like to make this for my daughter. it is so cute. thanks
Post a Comment